
How to Build a CI/CD Pipeline for a WordPress Site with GitHub Actions
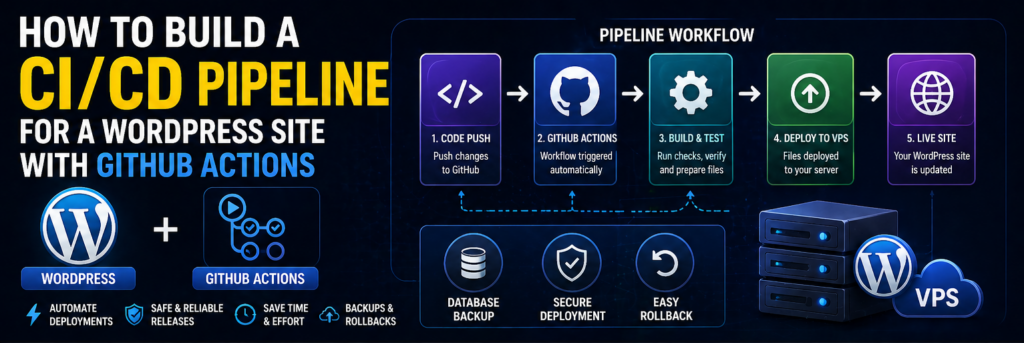
Managing a WordPress site manually is fine when you’re just starting. But once you begin making frequent updates, deploying changes manually becomes risky and inefficient.
Uploading files via FTP, editing code directly on the server, and forgetting backups are common mistakes that lead to downtime and broken websites.
This is where CI/CD comes in.
By combining WordPress with GitHub Actions, you can automate deployments, reduce human errors, and maintain a professional workflow — just like modern DevOps teams.
In this guide, you’ll learn how to build a complete CI/CD pipeline for WordPress using GitHub Actions, step by step.
What is a WordPress CI/CD Pipeline?
CI/CD stands for:
- Continuous Integration
- Continuous Deployment
In simple terms:
👉 Every time you push code to GitHub → your site updates automatically on your VPS
Why Use CI/CD for WordPress?
1. No Manual Uploads
Forget FTP and manual file copying.
2. Safe Deployments
Rollback easily if something breaks.
3. Faster Workflow
Push → Deploy → Done.
4. Version Control
Track every change in Git.
Prerequisites
Before starting, you need:
- VPS (Ubuntu recommended)
- WordPress installed
- SSH access
- GitHub repository
CI/CD Architecture for WordPress
Basic flow:
- Developer pushes code
- GitHub Actions triggers workflow
- Files are deployed to VPS
- Website updates automatically
Step 1: Prepare Your WordPress Project
Your repo should include:
- wp-content folder
- themes
- plugins
- custom code
👉 Avoid committing core WordPress files (best practice)
Step 2: Set Up SSH Access
Generate SSH key:
ssh-keygen -t rsa -b 4096
Copy key:
ssh-copy-id user@your-server-ip
Step 3: Add SSH Key to GitHub
Go to GitHub → Settings → Secrets
Add:
- VPS_HOST
- VPS_USER
- SSH_PRIVATE_KEY
Step 4: Create GitHub Actions Workflow
Create file:
.github/workflows/deploy.yml
Step 5: Add CI/CD Workflow
name: Deploy WordPress

on:
  push:
    branches:
      - main

jobs:
  deploy:
    runs-on: ubuntu-latest

    steps:
      - name: Checkout Code
        uses: actions/checkout@v3

      - name: Setup SSH
        run: |
          mkdir -p ~/.ssh
          echo "${{ secrets.SSH_PRIVATE_KEY }}" > ~/.ssh/id_rsa
          chmod 600 ~/.ssh/id_rsa

      - name: Deploy to VPS
        run: |
          rsync -avz --delete ./wp-content user@${{ secrets.VPS_HOST }}:/var/www/html/
Step 6: Test Deployment
Push changes:
git add .
git commit -m "Test CI/CD"
git push
Step 7: Automate Database Backups
Add step:
ssh user@server "mysqldump dbname > backup.sql"
Step 8: Add Rollback Strategy
Keep previous versions:
cp -r /var/www/html /backup/site-$(date +%F)
Step 9: Optimize Deployment
- Deploy only changed files
- Exclude cache/logs
- Use staging environment
Security Best Practices
- Use SSH keys only
- Disable password login
- Restrict server access
Common Mistakes
- Deploying entire WordPress core
- Not backing up database
- Not testing workflow
Real-World Insight
Most WordPress issues happen due to:
👉 manual deployments
FAQs
Is CI/CD needed for WordPress?
Yes, for serious projects.
Can beginners use it?
Yes, with simple setup.
Final Thoughts
A CI/CD pipeline for WordPress is no longer optional if you want reliability, scalability, and professional workflows.